I am writing this article mainly to make aware the possibility that some Morris to Marina hub conversion installations could be faulty causing undue wear to the Minor front axle. I was also inspired by the lack of concern from the seller of the kit, with no response to rectify the problem, only the comment that "my axle must be different send back the kit for a refund". They also refused to refund the postage which under both the Sale of Goods Act and Distance Selling Law they should have done. I believe that these kits (at least the ones both I and my friend had) are poorly engineered as the parts I had were different sizes, seems odd to me (or just bad luck) that the two kits I got were both faulty when apparently there have not been any others. My only conclusion is that they are going unnoticed and the seller was giving me more Bull than Motif !!
Enough groaning and on to the saga and what I learned. (disclaimer)
Setting the sceneKnowing that I was going to restore my Morris Minor and possibly update various aspects of it, including the ubiquitous 1275 engine and Marina disc brakes, I bought a Minor that had an apparently blueprinted engine with Marina disc brakes on the front that I could use as a donar of parts. The actual bodywork, a splitscreen, was probably better than my Morris except for the interior and it was only sentimental reasons for restoring mine. I stripped the donar mog and scrapped the body shell. (I did try selling/giving it away but no takers). I cleaned off some of the parts and it all lay about the garage (and house) for a number of years while I worked on welding up the gaping holes in my Morris (see here for the restoration blog).
Rebuilding the Marina bits
Having completed the welding, I started looking at building up the suspension and front brakes. I decided to replace the hub bearings and ordered up some Marina bearings, taking the old ones I'd knocked from the hubs along to check I'd got the same. They were the same and after getting them home I checked them on the axle shaft. The bearings didn't fit - or more precisely they did fit but were very loose. A quick call to my mate Andy confirmed that there should be a sleeve that goes between the shaft and bearing for the inner bearing and the outer fits as is. Funny, I didn't see any sleeving in my pile of bits and neither bearing fitted.
How not to do a Marina to Morris conversion
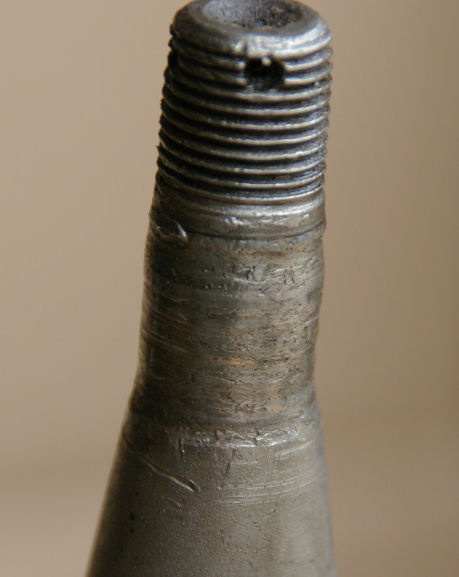
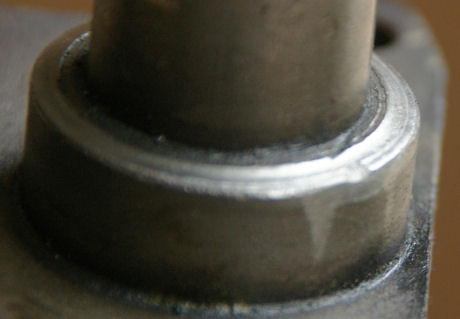
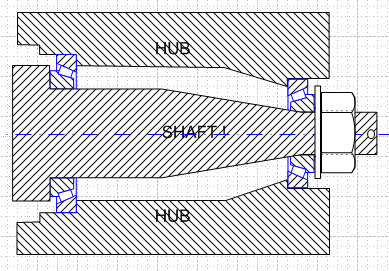
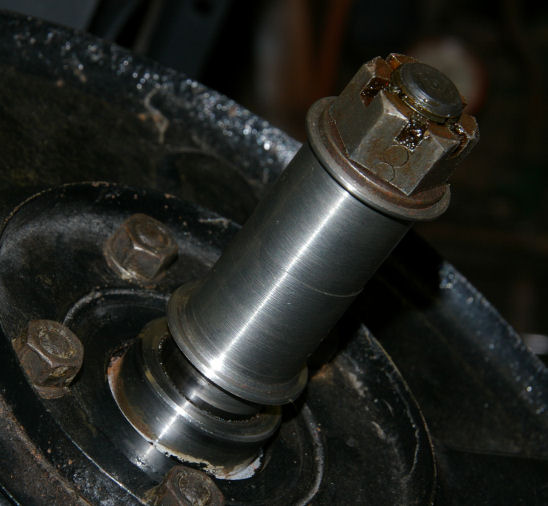
A lack of sleeving and a set of Marina bearings that fitted somewhat loosly made me wonder how this conversion was actually done. A closer look at the axle shafts of the donar Mog revealed some interesting markings. One axle looked ok but the other showed a lot of wear on the area under the outer bearing and also in the oil seal shoulder (the stepped bit the seal runs on) of the inner bearing (see pics). The good (better of the two at least!) shaft on closer inspection had a radial mark around the start of the shaft taper and also some wear on the oil seal shoulder. All the markings indicate that the Marina hub with its Marina bearings were put on the Morris axle shaft and tightened up to remove the wobble of the loose bearings. The only point of contact for the bearings to the shaft were the shoulder on the oil seal section for the inner bearing and the taper on the shaft for the outer bearing plus the hub nut and any movement to allow the bearing to rest on the shaft. To get the split pin in, the hub nut would be a different tightness between each of the hubs; hence giving one side a greater chance to move. Any movement in the bearings would give the wear seen in the pictures. Here's the amazing part - as the hub nut was tighted the hub is pushed toward the backplate to such an extent that it contacted the backplate. Clearly this should be a warning that something is not quite right and some spacer is required to get the hub offset correct, not so with this conversion, the solution was to cut off the back of the hub halving the width of the oil seal housing (I forgot to take a picture - doh!). For some reason the opposite side didn't make an obvious contact and was not removed however movement in the loose bearings resulted in the back of the hub touching and wear occuring, presumably on cornering. |
|
A not so quick fix
I had originally thought the uprights on the donar mog conversion were different so I had painted them up for use - oddly I never took any notice of the wear on them. Luckily I still had my Morris uprights which having dismantled them I now remember that I had put new ones on a number of years earlier so they were is as new condition, I just had to paint them and fit the missing conversion kit which I had to buy. I ordered mine from Bull Motif but it’s the same kit from other places too. They arrive very quickly and I tried the bearings and sleeving on the axles.
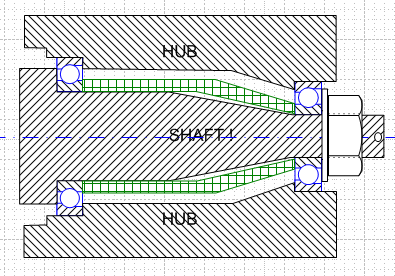
A quick diversion on how bearings work A bit of googling and I learnt about the bearings and how they fit (isn't google great?!). The original bearings on the Morris axle are an Angular Contact Ball Bearing see picture and are fixed on the axle by being pinched between the oil seal shoulder and the hub nut with a spacer (coloured green in the diagram) that exactly matches the hub bearing spacing between. This is why there is no adjustment in the original hub bearings. The inner ring of the bearing is held by its sides and can't spin round even though it may b a sliding fit to the axle shaft. |
Angular Contact Ball Bearing |
Morris Minor Front Axle and Hub |

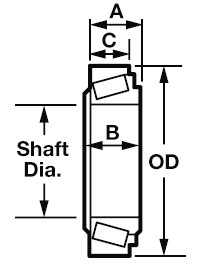
In contrast the Marina bearings are Taper Roller Bearings (see picture) and can not rely on being held in place by the hub nut as this affects how tight the bearing is. Remember the original bearing has the spacer to prevent the bearings going tight when the hub nut is tightened. The taper bearings are fixed to the axle just by being a tight fit and the hub nut takes up play in the rollers. |
Taper Roller Bearing |
Marina From Axle and Hub |
Bearing creep
The importance of the fit of the taper bearing to the axle surface is critically important as unlike the angular bearing it is not held by its sides. The only thing that stops the bearing turning on the shaft (rather than the bearing turning on its rollers) is the tightness of it on the shaft. If it is loose then it will creep round as the hub turns - this is known as bearing creep. Bearing creep will cause wear on the shaft which can lead to premature failure.
The Marina axle shaft is thicker than the Morris shaft so the Marina bearings are loose on a Morris axle. In this case even with over tightening the nut bearing creep easilly occurs as shown by the worn shafts.As we saw previously with the wrong bearings fitted.
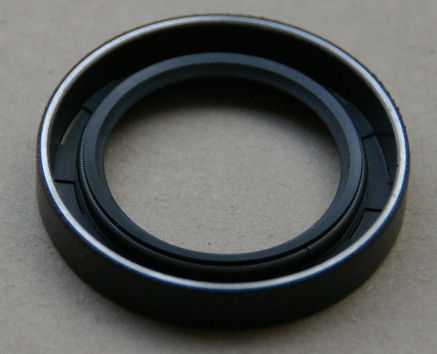
Fitting the conversion kit The conversion kit is basically a sleeving that the Marina bearing goes over and a replacement outer bearing. This choice is down to the fact that a correct size inner bearing is not available. Well, the moment of truth - I tried to fit the sleeving and …. Flop, it slipped over the shaft all to easily. Of the two sleevings I had (left and right) one could rotate on the shaft but was just touching the area where the oil seal goes, and the other touched nowhere and spun around easier than the bearings! The sleeving in the kit is shaped as shown in red in the diagram. Note that the oil seal runs on the sleeving which is not as smooth and hard as the original oil seal surface, a possibility for accelerated wear. The looseness of the sleeve and the friction of the seal will ensure that bearing creep (well sleeving creep!) will occur unless the sleeving is tight to the shaft and the bearing tight to the sleeving. |
 |
Another call to my friend confirmed that he remembered his sleeving being loose and that he used locktite to fix it. Clearly the loose fit is not acceptable (gluing it on is not ideal) and to top that the sleevings where not the same bore, one wobbled a lot more than the other - see the wobbly video here. The first and second parts of the video show me fitting the sleeving to the left and right axle shafts. The last part shows the original Morris bearing on the shaft and me trying to wobble it. No wobble of the Morris bearing shows that the bore of the sleeving must be bigger than the bore of the bearing and so if the sleeving correctly fitted a shaft (which in returning the kit I was told it did) then a standard Morris bearing would not fit that shaft - hmm, not a Morris shaft then is it?! Even though I sent the faulty kits back, I still lost out on my postage. |
|
My solution
I did a lot of careful measurements and a bit of online searching and found www.simplybearings.co.uk which seams to have every bearing and a good search facility. Putting in the required sizes of bearing to span the gap from Marina hub to Morris shaft came up with some explaination as to why there is a sleeving. There is no bearing to fit for the inner bearing so the Marina bearing (Part No. 44610 / 44649) plus a sleeving has to be used. For the outer bearing there is also no imperial sized bearing however there is a metric bearing (Part No. 30203). A metric bearing would not normally fit an imperial sized housing however some metric bearings are in fact imperial bearings, that is they were made on the old imperial equipment and then labelled as the nearest metric size. Obviously once this has been done it has to continue for consistency of that particular bearing size. So for the outer bearing outer size which is 1.570" the so called metric bearing is labelled as 40mm - however 40mm = 1.5748". When measured the so called 40mm bearing was actually 1.570". So don't believe whats written on the packet!!
On the same web site they list oil seals and it is possible to get the correct size oil seal to fill the gap. To make construction of the sleeving easier I decided to use an oil seal that would run on the original Morris oil seal shoulder. I only have a worn out lathe so the less operations the more chance I can make something successfully! The size of the sleeve is determined by the shaft and bearing sizes however the width of the shoulder on the sleeve had to be determined by building the hub up. This width affects where the hub sits on the shaft. It has to be positioned so that it doesn't hit the backplate but the nut/split pin must fit and also the position of the disc must be central in relation to the caliper. The caliper can be shimmed inboard but not out due to the fixing plate. This meant the shoulder was about 1.5mm. The little sleeve in the picture is a test one I made so that I could get the shoulder offset correct and set up the lathe. My lathe is out of alignment and needs adjusting. To avoid this I did a number of cuts checking for how parallel I was and adjusting the tool angle on the compound slide until it was correct. I used the compound slide to perform the cut - not sure if that is a good approach but it saved me working out how to align the lathe. (see another article yet to be written on this job!). The Other two sleevings are a left and right, they are different lengths but that doesn't matter as the extra length is only there to allow it to be pulled off the shaft later without damaging the part the bearing sits on. They were very slightly different internal diameters (less than 0.001" difference). One pushed onto the shaft by hand and with some force could be rotated (transitional fit), I added a little Locktite to that one - the other was a tight fit (interference fit). The tight one I pushed on using the other sleeve and the hub nut - see picture.
|
 |
The oil seal required to fit the gap between the hub and shaft is unavailable in the width of the original seal. However there is one of the next thickness up; 0.37" instead of 0.31" (Model Number 1.37x2.06x0.37_R21) . Unfortunately fitting this caused the seal to touch the backplate. To fix this I cut 0.050" from the seal, which created the correct thickness but has the effect of shifting the seal contact point on the shaft toward the bearing. It could be seen as an advantage as it would miss any wear caused by the original seal position. The change in position is not enough to make the seal fall off the seal shoulder. Once fitted to the shafts the bearing was fitted to the hub and the hub pushed on. I had to gently tap the hub on and the outer bearing and it all worked fine. |
|
Although it was a pain to have to make my own conversion (losing considerable time in my restoration progress and losing the postage costs) I think that I have a better solution than that on the market - at least I eliminated that wobble seen in the video.
Hopefully this page will be informative and hepful for anyone considering doing their own conversion.